
Home Improvement
Upgrading Your Garden for Summer 2022

Summer is on its way, so it’s time to turn your attention to your garden. We’ve all spent so much time indoors over the last two years that our houses have never looked better. Most of us have overhauled our interiors, investing in new furniture and décor. It seems everyone’s home’s are Instagram worthy, but how many people can say the same about their garden?
Our bet is very few, and that’s why we’ve put together this quick guide on upgrading your garden in line with your home for 2022. After all, with Covid restrictions now finally easing, this is set to be the year of outdoor entertainment, so you need to make sure your garden is up to the job.
Replacing the lawn
Firstly, think about your lawn. This is likely to be the biggest area of your garden and so has the largest impact on how the rest of your space looks and feels. This means if it’s looking a bit worse for wear, it’s a good idea to prioritize this area first as this will instantly change how your outdoor space looks. Artificial grass is a good option if you want permanently good-looking lawn without the effort, especially if your real lawn sits in the shade or doesn’t have optimal conditions to grow and thrive.
If you’d prefer to keep your real lawn, this can still be replaced and made to look better with the help of seed, watering, and edging.
Buying new furniture
The way you can upgrade your garden is to buy new furniture so you can relax in your garden in style. Rattan furniture is always a good option for outdoor furnishing because it’s timeless and matches with every décor style. It’s also comfortable and easy to clean, making it a good option for those with pets and kids who may otherwise struggle to keep their gardens and furniture looking tidy.
Installing a canopy of lights
As the warm summer nights approach, it’s only natural that you’ll want to spend more time outside enjoying nature. With a canopy of lights, you can do just this, even when the sun has set. A light canopy can instantly take your garden from average to ‘wow’, and it doesn’t take too much effort, either.
If you have two fences either side of your garden, you can extend the height using wooden posts and create beams going across the width of your patio area. Then, all you need to do is attach some string fairy lights. It’s a simple idea but one that can make all the difference to the overall aesthetic of your garden – especially if you place you new furniture underneath it.
Brightening it up
The key to a good-looking garden is to make it light and bright, especially if you don’t have a lot of natural light. An easy way you can do this is by painting your garden fence a pale color like white, off-white, or a pastel shade. Add some lights between your planters (if you have any) or string lights along the perimeter of the fence and you’ll instantly brighten it up.
You can also add some bright colored flowers if you don’t have any, too, as this will also have an immediate effect on how your garden looks and will inject some life into it
Making it cozy
The final way you can upgrade your garden for 2022 is to make it cozy. If you install a light canopy and get new furniture like mentioned above, consider adding a rug underneath to make your patio area seem more like an outdoor living room, and invest in throw cushions and blankets so you can stay warm in the evenings. Just remember to bring them inside!
Home Improvement
The Art of Modern Food Storage: Mastering Kitchen Organization and Ingredient Freshness
Maintaining an organized and efficient kitchen is one of the most rewarding home habits a person can build. Food storage goes far beyond simply placing groceries onto open shelves or sliding produce into refrigerator drawers without a plan. Proper preservation methods protect the nutritional value, flavor profiles, and physical textures of your favorite ingredients, ensuring that meal preparation remains a joyful and stress-free experience. When ingredients are stored intentionally, households significantly reduce unnecessary food waste, save valuable time during busy weekdays, and cultivate a cleaner, more harmonious living environment.
Understanding how different ingredients react to ambient temperatures, air exposure, light, and atmospheric humidity allows home cooks to create tailored storage routines for every item in the pantry and refrigerator. Transitioning toward a well-managed storage system does not require complete kitchen overhauls or overly complex systems; rather, it relies on applying foundational preservation principles and adopting practical daily habits. By paying close attention to environmental conditions and selecting appropriate storage vessels, you can transform your kitchen into an efficient, beautiful culinary sanctuary that keeps ingredients at peak quality.
The Foundations of Efficient Kitchen Food Storage
Understanding the Pillars of Ingredient Preservation
Every food item in your kitchen begins to degrade from the moment it is harvested or processed, primarily due to exposure to oxygen, ambient humidity, temperature fluctuations, and direct light. Oxygen causes fatty acids in nuts and seeds to turn rancid, while moisture turns crisp goods soggy and encourages mold spores to thrive in warm, dark corners. Sunlight can strip spices of their delicate aromas and break down vitamins in oils stored on open countertops. Recognizing these environmental forces empowers you to design storage environments that act as natural shields, effectively slowing down natural degradation and keeping ingredients fresher for considerably longer periods.
Assessing Your Kitchen Space and Daily Cooking Habits
Before introducing new storage containers or reorganizing your cupboards, it is essential to analyze the unique physical layout and daily workflow of your cooking area. Take note of which zones receive direct heat from ovens or stovetops, as well as areas near windows exposed to bright afternoon sunlight. Observe how often your household uses core staples versus specialty ingredients, ensuring that high-rotation items remain effortlessly accessible. Designing a custom storage framework based on your realistic daily routines prevents clutter from forming, streamlines grocery unpacking, and makes maintaining long-term pantry order an effortless part of your lifestyle.
Strategic Storage Tactics for Dry Pantry Ingredients
Combating Environmental Factors That Threaten Dry Goods
Pantry staples such as grains, flours, dried beans, pasta, and whole spices appear resilient on the surface, but they remain highly vulnerable to subtle shifts in air quality and humidity. Unopened cardboard boxes and thin original plastic bags offer minimal protection against moisture absorption or ambient kitchen odors that seep into unsealed cupboards. Over time, humidity causes fine powders to clump together into solid blocks and compromises the delicate crunch of whole grains and crackers. Shielding your dry inventory from ambient air and elevated temperatures ensures that pantry staples maintain their original flavor, aroma, and structural integrity throughout their shelf life.
Implementing Proper Decanting and Container Selection
Transferring dry goods from commercial packaging into dedicated, impermeable containers is a foundational strategy for long-term pantry organization and protection. Transparent glass jars and high-grade BPA-free plastic vessels with reliable seals create impenetrable barriers against airborne moisture, dust, and lingering kitchen aromas. Decanting ingredients allows you to assess remaining inventory at a single glance, eliminating the frustration of accidentally buying duplicates or running out of essential items during cooking. Furthermore, uniform containers maximize cupboard space by stacking neatly, instantly turning chaotic, mismatched pantry shelves into a visually serene and highly functional workspace.
Optimizing Cold Storage for Perishables and Produce
Refrigeration Practices That Prevent Unnecessary Food Waste
The refrigerator is a critical appliance for food preservation, yet improper organization can inadvertently accelerate spoilage and lead to forgotten produce hiding in lower drawers. Refrigerators possess natural microclimates, with top shelves maintaining steady temperatures ideal for prepared foods, while lower compartments provide the colder conditions required for raw proteins. Humidity-controlled crisper drawers should be adjusted based on the specific needs of your produce, keeping high-humidity settings for leafy greens and lower humidity settings for ethylene-producing fruits. Leaving adequate breathing space between items allows cold air to circulate freely, preventing localized warm spots and premature spoilage.
Advanced Freezing Techniques for Long-Term Freshness
Freezing is one of the most effective methods for locking in peak nutritional value and extending the lifespan of fresh produce, herbs, and pre-cooked meals. To achieve optimal results, food items must be prepped correctly by washing, thoroughly drying, and cutting them into uniform, cook-ready portions prior to freezing. Flash-freezing individual produce pieces on a flat tray before transferring them into airtight freezer bags stops ingredients from fusing into a solid mass. Removing as much air as possible from freezer packaging prevents freezer burn, preserving the vibrant color, delicate texture, and natural flavor of frozen items until you are ready to enjoy them.
Modern Innovations in Food Preservation Technology
Integrating Smart Airtight Systems into Daily Routines
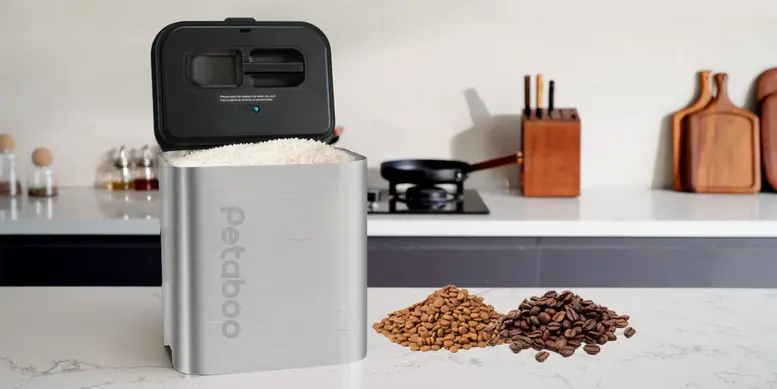
In recent years, kitchen preservation technology has advanced beyond basic snap-lid containers to offer sophisticated sealing methods designed for sensitive pantry items. Advanced container designs utilize high-grade silicone gaskets and multi-point locking latches to create tight seals that actively resist humidity changes in the home environment. Utilizing standardized, high-performance container systems makes it effortless to store delicate items like artisanal teas, roasted coffee, and dried seaweeds without fear of ambient moisture compromise. These modern storage solutions combine practical utility with clean aesthetic designs, elevating the overall visual appeal of your open kitchen shelves and cabinets.
Enhancing Pantry Longevity with Automated Solutions
For items that are particularly sensitive to oxidation, such as whole coffee beans, raw nuts, and fine specialty grains, active air evacuation provides an extra tier of long-term protection. Integrating an自動真空保存ケース into your daily routine helps eliminate trapped air with minimal effort, maintaining optimal low-pressure conditions that slow down ingredient degradation far better than passive airtight seals can achieve on their own. This hands-free approach continuously protects high-value ingredients from staling, ensuring that every morning coffee or home-baked treat delivers maximum aroma, rich flavor, and uncompromising freshness every time.
Cultivating Sustainable Kitchen Habits for the Long Term
Establishing Weekly Pantry Audits and System Maintenance
Building a sustainable kitchen organization routine relies on consistent, low-effort maintenance rather than occasional, overwhelming cleanouts. Dedicating just ten minutes each week to auditing your refrigerator shelves, inspecting cupboard corners, and wiping down food prep surfaces prevents minor spills from creating persistent sticky spots. Rotating older inventory toward the front of shelves ensures that opened packages are consumed before newly purchased groceries are opened. These brief weekly check-ins keep your storage systems working efficiently, help you monitor ingredient freshness, and ensure your kitchen remains clean, functional, and organized month after month.
The Mindful Culinary Experience of an Organized Kitchen
An intentionally organized kitchen transforms cooking from a chore into a calming, creative activity that fosters wellness and mindfulness at home. When every ingredient has a designated, protected location, preparing daily meals becomes an effortless process where finding items and cleaning up take minimal time. Knowing that your food supply is safely stored and thoroughly protected against spoilage brings a rewarding sense of comfort and satisfaction to home living. Embracing smart storage habits ultimately enhances your relationship with food, nurtures sustainable household practices, and allows you to enjoy freshly prepared meals with absolute peace of mind.
Read More: jennie pegouskie ethnicity

Stairlifts are a practical adaptation designed to support people who experience difficulty using stairs within their own homes. They are most commonly associated with older adults, but they are also used by individuals with mobility impairments, balance issues, joint pain, or long term health conditions. Rather than changing home layouts entirely, a stairlift allows continued access to all floors of a property while maintaining independence and safety.
Why Stairs Become a Challenge
Stairs can present a gradual or sudden barrier. Reduced strength, limited flexibility, impaired balance, or recovery from surgery can all make climbing stairs difficult or unsafe. In many homes, key living spaces such as bedrooms and bathrooms are located upstairs, meaning that restricted stair access can significantly affect day to day living. Stairlifts aim to reduce this risk by providing a stable seated platform that moves smoothly between floors.
How Stairlifts Work
A stairlift typically consists of a motorised chair or platform attached to a rail fixed along the staircase. The user sits on the chair, secures a seatbelt, and operates the lift using simple controls, often mounted on the armrest. The chair then travels along the rail at a controlled speed. Most modern stairlifts include safety features such as obstruction sensors, swivel seats at the top of the stairs, and soft start and stop mechanisms to improve comfort and stability.
Types of Stairlifts Available
There are several types of stairlifts designed to suit different home layouts and user needs. Straight stairlifts are used on staircases without bends or landings, while curved stairlifts are custom fitted to follow more complex staircases. Some homes may require outdoor stairlifts for access to entrances or gardens. There are also standing or perching stairlifts for users who find sitting difficult, although seated models are more common.
Considerations Before Installing a Stairlift
Before installing a stairlift, several practical considerations should be reviewed. Staircase width is important, as the lift must allow safe passage for other users when not in use. Power supply requirements, potential building regulations, and future mobility needs should also be assessed. Many people choose to plan ahead, installing a stairlift before mobility becomes severely limited, which can make the transition easier and less disruptive.
Impact on Daily Living
The presence of a stairlift can significantly change how a home is used. It may reduce the need to relocate bedrooms or bathrooms to the ground floor and can support continued independence. For some households, it also reduces reliance on carers or family members for assistance with stairs. While a stairlift does not address all mobility challenges, it often plays a role in enabling people to remain in their own homes for longer.
Maintenance and Ongoing Use
Stairlifts require routine maintenance to ensure safe operation. This typically includes battery checks, rail inspection, and general servicing. Users are usually advised to keep the rail clear and to report any unusual noises or changes in movement. With proper care, stairlifts are designed for long term use and can adapt to gradual changes in mobility needs.
Stairlifts in a Local Context
The need for home adaptations continues to grow as more people aim to remain living independently. In urban areas with varied housing styles, staircases can differ widely in shape and size, which influences stairlift design and installation. For households considering options later in life, understanding how stairlifts fit into local housing stock is an important part of planning. This applies equally to those researching stairlifts Birmingham as part of broader discussions around ageing, accessibility, and home safety.
Read More: jacqulyn elizabeth hanley

In the quest to find homes that blend modernity and tradition, homeowners have found innovative ways to reflect the old with the new. The fusion of contemporary and traditional now creates spaces that are visually appealing and traditionally resonant. Whether you live in a metropolitan city or a serene countryside, Indian homes offer endless possibilities to create spaces that are inviting, warm, and that reflect the homeowner’s personality. This article explores how modern homes can incorporate old beliefs with contemporary style.
Understanding Indian home decor
The Indian home decor is deeply rooted in traditions and culture. From handcrafted wooden furniture to artefacts, every element in our homes has a story to tell. However, now that our lifestyles have evolved, modern influences have made their way into Indian homes. Back in the day, Indian furniture was crafted with teak, mango wood or rosewood. This wood was known for its intricate serving and durability. Diwan, cabinets and swing seats added a luxury touch to the space. Handcrafted items from brass lamps to terracotta figurines added a sense of charm and authenticity. Also, many Indian homes incorporated spirituality through idols, pooja mandirs and rangoli designs.
Bringing in the modern influences
If you are adopting a minimalistic approach, replace heavy furniture with sleeker designs. Opt for neutral colour palettes and clean lines that complement the traditional pieces you already have in your home. Modern furniture combined with traditional craftsmanship can blend effortlessly with any interiors when chosen thoughtfully. Cabinets with hidden storage are perfect for homes where space is a constraint. Pair traditional decor with modern art pieces such as abstract paintings or sculptures. This can act as a focal point and bring a striking balance to the home. Technology integration can also be done effortlessly. Smart devices like climate control systems and automated lighting can be added, and this offers the best of both worlds.
Decorating Different Spaces
Living Room
Include a wooden jhoola or a sleek sofa set and a carved coffee table in the living room. Combine contemporary floor lamps with brass lanterns to introduce a touch of nostalgia. Pair your upholstered sofa with soft neutral tones for warmth and maintain a contemporary feel. Also, try adding traditional artworks or abstract paintings to create a space that resonates with both innovation and heritage.
Bedroom
In the bedroom interiors, choose a minimal bedframe with wood detailing in the headboard. To complement this, use soft furnishings in earthy tones or embroidered cushions. If your room is too modern, include wooden wardrobes and vintage dressers to retain timeless charm.
Dining area
Dining areas are a perfect place to show off the roots of the traditional Indian spirit. Opt for solid wood dining tables with contemporary chairs and include traditional elements like cane weaving. Modern chandelier or pendant lamps in the dining area can act as a bridge between both styles. A crockery unit or a sideboard can further enhance the space.
Kitchen
A kitchen should be efficient and soulful. To bring warmth into the kitchen, use sleek cabinetry with wood-finish laminates and stone countertops. Utensils in the traditional styles or materials can add a cultural touch. To ensure functionality, integrate smart appliances without compromising on aesthetics.
Outdoor space
Bamboo furniture and terracotta pots add a traditional touch. You can also blend in subtle backlighting, wooden panels or jaali for elegance.
Blending tradition and modernity in Indian homes is more than just a design choice. It is a mix of innovation and heritage thoughtfully integrated. You can create a home that is deeply personal, aesthetically pleasing and functional. At D’LIFE interior designers in Bangalore , we understand the essence of Indian homes. With a wide range of furniture choices and decor items in hand, D’LIFE helps you achieve the perfect balance.
Let your home be a reflection of your beauty, past and present – choose D’LIFE. Backed by two decades of D’LIFE’s expertise, it brings together precision engineering, innovation and aesthetics that perfectly complement modern lifestyles. Every design is tailored to be built to last, meet individual needs and enhance the beauty of every home.

The Art of Modern Food Storage: Mastering Kitchen Organization and Ingredient Freshness
Maintaining an organized and efficient kitchen is one of the most rewarding home habits a person can build. Food storage...


Why Low-Profile Folding Chairs Are the Ultimate Road Trip Hack
Imagine driving for three hours along a winding coastal highway. The sun is starting to dip, and you spot a...


Design Meets Innovation: The Hottest Trends in Custom Trade Show Exhibits for 2026
As businesses look to reach prospects in new, interesting, and memorable ways, trade shows are evolving too. Exhibit spaces are...


Wardrobe Hangover: Why You Keep Buying Clothes You Don’t Wear
The Quiet Shame Hanging in Your Closet Open your wardrobe right now. Look at it honestly. How many pieces in...


The Outfit That Speaks for Itself: Zach Bryan Merch, Parke, and Rolex Replica Every Day
Getting Dressed Should Feel Like a Decision, Not a Default Every morning, you choose what to wear, even when it...


Men’s Streetwear Denim Guide 2026: How Amiri and Mixedemotions Get Premium Jeans Right
Why Denim Became the Most Debated Purchase in Men’s Streetwear Denim sits at a strange intersection in men’s fashion. It’s...


Why Some Online Casino Games Feel Easier to Return To
Online casino lobbies are full of games trying to look different. One has a huge bonus feature. Another has a...


When Access Becomes Instant Patience Becomes Optional: Z library
The Speed of Modern Reading Long waits once shaped the reading world. A trip to the library meant fixed hours...


Assessing the Chances of South Africa at the World Cup
Football followers across the globe are counting down the days until the World Cup with fans in South Africa eagerly...


Designs that Support Longevity in Online Gambling Platforms
Online gambling platforms, including mobile apps like betway, are at their most popular today and that is not by luck...


Do Infants Sleep More When Teething? Understanding Sleep Patterns During Teething

The Art of Blending Tradition and Modernity in Indian Homes

Understanding Common SMTP Errors and Their Impact on Email Campaign Performance

The Power of Digital Marketing for Business: A Guide to Maximizing Your Reach

Car Hire vs Public Transport: Which Is Best for Touring Switzerland?

Building trust in a rapidly evolving payments ecosystem
-
 Biography7 years ago
Jacqulyn Elizabeth Hanley is the Mother of Liza Soberano?
-
Biography7 years ago
Amanda Levy Mckeehan Biography, Family, Net Worth, Age, Affairs, Facts
-
Home6 years ago
Epson L3110 Driver Free Download Latest Updated Version
-
Games5 years ago
Best Free To Play MMORPG To Try This 2021
-
Biography7 years ago
Who is Rose Dorothy Dauriac? Scarlett Johansson Daughter?
-
Home7 years ago
Liza Soberano Biography, Age, Family and Boyfriends
-
Biography7 years ago
Jessica Ditzel Secret Information that Nobody Knows | Joe Rogan’s Wife
-
Biography7 years ago
What is the relation of Nathaniel Larry Osorno with Liza Soberano?