
Home Improvement
DIY Living Room Lighting Upgrades

Are you tired of the dull and uninspiring lighting in your living room? Do you want to add some warmth and character to your space without breaking the bank? Look no further! With these DIY lighting upgrades, you can transform your living room space and make it more inviting, cosy, and functional. From statement fixtures to simple upgrades, here are some ideas to get you started.
Statement Pendant Lights
If you want to make a bold statement in your living room, adding a pendant designer lightning is a great way to do it. Whether you go for a minimalist or extravagant design, pendant lights can serve as a centrepiece of your room and add some much-needed visual interest. Plus, they come in all shapes, sizes, and styles, so you can easily find one that matches your aesthetic.
To install a pendant light, you will need to remove the existing fixture and replace it with a ceiling plate that can support the weight of the new fixture. It’s also important to measure the height of your ceiling and the length of the cord or chain to ensure that the pendant light hangs at the right level.
LED Strip Lighting
If you want to add some mood lighting to your living room, LED strip lighting is a simple and inexpensive solution. These thin strips of LED lights can be placed under your shelves, cabinets, or furniture to create a warm and cosy glow. You can also install them behind your TV or around your windows for an extra pop of colour.
LED strip lights are energy-efficient and can last up to 50,000 hours, making them a cost-effective lighting option. You can also choose from a variety of colours and brightness levels, and even set them to change according to the music or movie you’re watching.
Floor Lamps
Floor lamps are a versatile and practical lighting option for any living room. They can be moved around to different corners of the room, and they provide additional lighting for reading or working. Plus, they come in a wide range of styles, from sleek and modern to rustic and vintage.
When choosing a floor lamp, consider the height, shade style, and bulb type. A lamp with an adjustable arm or shade can provide more flexibility, while a lamp with a dimmer switch can help create the perfect ambiance.
Recessed Lighting
If you want to create a clean and modern look in your living room, recessed lighting is the way to go. These lights are installed in the ceiling and provide a subtle, ambient glow. They can also be used to highlight artwork or architectural features.
To install recessed lighting, you will need to cut holes in your ceiling and run wiring to the new fixtures. This can be a more involved project than some of the other upgrades on this list, so it’s best to hire a professional if you’re not comfortable with electrical work.
Upgrade Lamp Shades
Upgrading your lamp shades is an affordable way to change the look and feel of your living room. You can choose from a variety of shapes, sizes, and materials to complement your living room’s style. For instance, a drum-shaped shade can create a modern and sleek look, while a bell-shaped shade can create a traditional and elegant feel.
Add Accent Lighting
Accent lighting can be used to highlight a specific area or object in your living room. You can install a picture light above your favourite artwork or a wall sconce next to your family photos. Accent lighting can create a warm and inviting atmosphere in your living room.
DIY Lampshade Upgrades
If you want to update your existing lighting fixtures without replacing them, you can try DIY lampshade upgrades. You can add fabric, paint, or other embellishments to your lampshades to give them a new look and feel. This is an easy and budget-friendly way to add some personality to your living room.
To create a DIY lampshade, start by measuring your existing shade and cutting your fabric or paper to size. Then, use glue or double-sided tape to attach the new material to the shade. You can also use stencils or paint to add designs or patterns.
With these DIY living room lighting upgrades, you can create a warm and inviting atmosphere in your home without spending a fortune. From statement pendant lights to simple lampshade upgrades, there are plenty of options to choose from. Just remember to consider your budget, style, and needs when selecting your lighting fixtures. And don’t be afraid to get creative and add your own personal touch to your space!
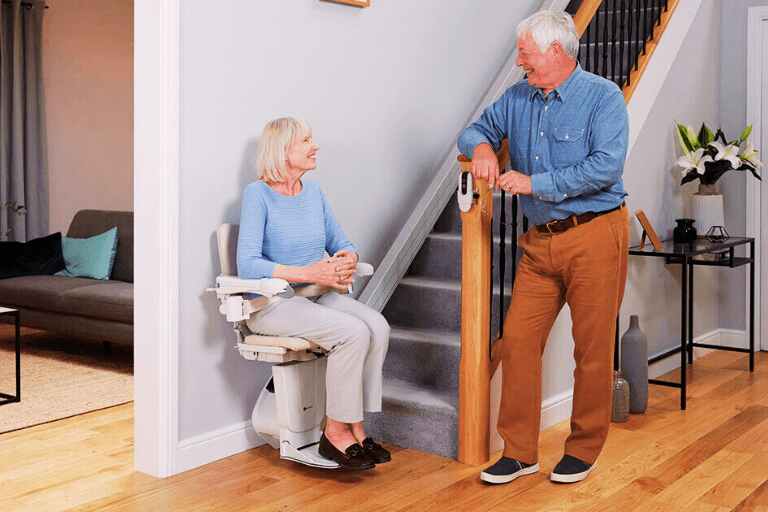
Stairlifts are a practical adaptation designed to support people who experience difficulty using stairs within their own homes. They are most commonly associated with older adults, but they are also used by individuals with mobility impairments, balance issues, joint pain, or long term health conditions. Rather than changing home layouts entirely, a stairlift allows continued access to all floors of a property while maintaining independence and safety.
Why Stairs Become a Challenge
Stairs can present a gradual or sudden barrier. Reduced strength, limited flexibility, impaired balance, or recovery from surgery can all make climbing stairs difficult or unsafe. In many homes, key living spaces such as bedrooms and bathrooms are located upstairs, meaning that restricted stair access can significantly affect day to day living. Stairlifts aim to reduce this risk by providing a stable seated platform that moves smoothly between floors.
How Stairlifts Work
A stairlift typically consists of a motorised chair or platform attached to a rail fixed along the staircase. The user sits on the chair, secures a seatbelt, and operates the lift using simple controls, often mounted on the armrest. The chair then travels along the rail at a controlled speed. Most modern stairlifts include safety features such as obstruction sensors, swivel seats at the top of the stairs, and soft start and stop mechanisms to improve comfort and stability.
Types of Stairlifts Available
There are several types of stairlifts designed to suit different home layouts and user needs. Straight stairlifts are used on staircases without bends or landings, while curved stairlifts are custom fitted to follow more complex staircases. Some homes may require outdoor stairlifts for access to entrances or gardens. There are also standing or perching stairlifts for users who find sitting difficult, although seated models are more common.
Considerations Before Installing a Stairlift
Before installing a stairlift, several practical considerations should be reviewed. Staircase width is important, as the lift must allow safe passage for other users when not in use. Power supply requirements, potential building regulations, and future mobility needs should also be assessed. Many people choose to plan ahead, installing a stairlift before mobility becomes severely limited, which can make the transition easier and less disruptive.
Impact on Daily Living
The presence of a stairlift can significantly change how a home is used. It may reduce the need to relocate bedrooms or bathrooms to the ground floor and can support continued independence. For some households, it also reduces reliance on carers or family members for assistance with stairs. While a stairlift does not address all mobility challenges, it often plays a role in enabling people to remain in their own homes for longer.
Maintenance and Ongoing Use
Stairlifts require routine maintenance to ensure safe operation. This typically includes battery checks, rail inspection, and general servicing. Users are usually advised to keep the rail clear and to report any unusual noises or changes in movement. With proper care, stairlifts are designed for long term use and can adapt to gradual changes in mobility needs.
Stairlifts in a Local Context
The need for home adaptations continues to grow as more people aim to remain living independently. In urban areas with varied housing styles, staircases can differ widely in shape and size, which influences stairlift design and installation. For households considering options later in life, understanding how stairlifts fit into local housing stock is an important part of planning. This applies equally to those researching stairlifts Birmingham as part of broader discussions around ageing, accessibility, and home safety.
Read More: jacqulyn elizabeth hanley

In the quest to find homes that blend modernity and tradition, homeowners have found innovative ways to reflect the old with the new. The fusion of contemporary and traditional now creates spaces that are visually appealing and traditionally resonant. Whether you live in a metropolitan city or a serene countryside, Indian homes offer endless possibilities to create spaces that are inviting, warm, and that reflect the homeowner’s personality. This article explores how modern homes can incorporate old beliefs with contemporary style.
Understanding Indian home decor
The Indian home decor is deeply rooted in traditions and culture. From handcrafted wooden furniture to artefacts, every element in our homes has a story to tell. However, now that our lifestyles have evolved, modern influences have made their way into Indian homes. Back in the day, Indian furniture was crafted with teak, mango wood or rosewood. This wood was known for its intricate serving and durability. Diwan, cabinets and swing seats added a luxury touch to the space. Handcrafted items from brass lamps to terracotta figurines added a sense of charm and authenticity. Also, many Indian homes incorporated spirituality through idols, pooja mandirs and rangoli designs.
Bringing in the modern influences
If you are adopting a minimalistic approach, replace heavy furniture with sleeker designs. Opt for neutral colour palettes and clean lines that complement the traditional pieces you already have in your home. Modern furniture combined with traditional craftsmanship can blend effortlessly with any interiors when chosen thoughtfully. Cabinets with hidden storage are perfect for homes where space is a constraint. Pair traditional decor with modern art pieces such as abstract paintings or sculptures. This can act as a focal point and bring a striking balance to the home. Technology integration can also be done effortlessly. Smart devices like climate control systems and automated lighting can be added, and this offers the best of both worlds.
Decorating Different Spaces
Living Room
Include a wooden jhoola or a sleek sofa set and a carved coffee table in the living room. Combine contemporary floor lamps with brass lanterns to introduce a touch of nostalgia. Pair your upholstered sofa with soft neutral tones for warmth and maintain a contemporary feel. Also, try adding traditional artworks or abstract paintings to create a space that resonates with both innovation and heritage.
Bedroom
In the bedroom interiors, choose a minimal bedframe with wood detailing in the headboard. To complement this, use soft furnishings in earthy tones or embroidered cushions. If your room is too modern, include wooden wardrobes and vintage dressers to retain timeless charm.
Dining area
Dining areas are a perfect place to show off the roots of the traditional Indian spirit. Opt for solid wood dining tables with contemporary chairs and include traditional elements like cane weaving. Modern chandelier or pendant lamps in the dining area can act as a bridge between both styles. A crockery unit or a sideboard can further enhance the space.
Kitchen
A kitchen should be efficient and soulful. To bring warmth into the kitchen, use sleek cabinetry with wood-finish laminates and stone countertops. Utensils in the traditional styles or materials can add a cultural touch. To ensure functionality, integrate smart appliances without compromising on aesthetics.
Outdoor space
Bamboo furniture and terracotta pots add a traditional touch. You can also blend in subtle backlighting, wooden panels or jaali for elegance.
Blending tradition and modernity in Indian homes is more than just a design choice. It is a mix of innovation and heritage thoughtfully integrated. You can create a home that is deeply personal, aesthetically pleasing and functional. At D’LIFE interior designers in Bangalore , we understand the essence of Indian homes. With a wide range of furniture choices and decor items in hand, D’LIFE helps you achieve the perfect balance.
Let your home be a reflection of your beauty, past and present – choose D’LIFE. Backed by two decades of D’LIFE’s expertise, it brings together precision engineering, innovation and aesthetics that perfectly complement modern lifestyles. Every design is tailored to be built to last, meet individual needs and enhance the beauty of every home.

The Benefits of Artificial Turf: A Green Dream Come True
Eco-Friendly Living: How Artificial Turf Conserves Water
In a world increasingly aware of environmental sustainability, the benefits of artificial turf extend far beyond aesthetic appeal. One of the most compelling reasons homeowners choose synthetic grass, especially in regions like San Diego, is its remarkable ability to conserve water. Traditional lawns require a staggering amount of water, approximately 55 gallons per square foot annually, to maintain lush greenery, which can strain our precious resources, particularly in drought-prone areas. With artificial turf installation in San Diego, this figure drops to nearly zero. This means homeowners can enjoy a beautiful, green lawn year-round without constantly engaging in water-wasting practices like excessive irrigation.
Moreover, the absence of pesticides and fertilizers further adds to the ecological benefits. Real grass often requires chemical treatments that can leach into the soil and local water systems, contributing to pollution. On the contrary, artificial turf does not necessitate these substances, contributing to a healthier ecosystem. By choosing synthetic grass, you are not only doing your part in environmental conservation but also lowering your water bill significantly. This proactive approach resonates particularly well in climate-conscious San Diego, making artificial turf a logical choice for eco-friendly living.
Low Maintenance Magic: Say Goodbye to Mowing and Weeding
Imagine a life where weekends are free from mowing the lawn or battling relentless weeds. The allure of artificial turf lies in this very fantasy. With synthetic grass, maintenance demands are drastically reduced compared to natural lawns, which require frequent cutting, weeding, fertilizing, and watering. This ease of upkeep significantly enhances your quality of life, providing you with more time to spend on activities you truly enjoy.
Instead of investing weekends in tedious yard work, you can now relax or pursue hobbies, reflecting on how much more enjoyable your home environment can be. To maintain artificial turf, all that is typically needed is occasional brushing to maintain the blades’ upright position and the removal of debris. Simple rinses to clear dust and dirt keep your lawn looking fresh. Even after heavy rains, synthetic turf drains efficiently, ensuring it dries quickly and looks appealing in no time.
Pet-Friendly Paradise: Creating a Safe Space for Your Furry Friends
For pet owners in San Diego, artificial turf presents an ideal solution for creating a safe and enjoyable environment for their beloved pets. Natural grass can become muddy and full of pests, leading to health issues for animals that frequent the outdoors. In contrast, high-quality synthetic grass is designed to be durable, providing a safe, non-toxic surface for pets to play and relax. Our furry friends can romp around without damaging the lawn or bringing mud into the house, making life considerably easier for pet owners.
Additionally, many artificial turf products come equipped with built-in drainage systems. This ensures that pet waste can be easily washed away without leaving lingering odors or unsightly messes. Regular maintenance is minimal; simply hosing down the area is generally enough to keep it clean and hygienic. These features allow pet owners to enjoy guilt-free outdoor time with their pets, knowing that both aspects of their lawn and their furry titans are well cared for.
Choosing the Right Turf: Navigating the Options in San Diego
Exploring Different Types of Artificial Grass: What’s Best for Your Yard?
As you consider transforming your outdoor space with artificial turf, understanding the various types available is essential. The market has expanded significantly, providing homeowners with numerous options tailored to different needs and aesthetics. For instance, some types of artificial grass are softer and ideal for residential settings, while others are designed for high-traffic areas, such as sports fields. Turf options range from polyethylene, known for its softness and appearance, often used in residential lawns to nylon, recognized for its durability and resilience, making it perfect for commercial applications.
Another critical factor is the pile height of the turf; this refers to the length of the blades. Shorter piles tend to be more durable and easier to maintain, making them great for pets and children, while longer piles can create a lush, natural appearance often preferred in residential landscapes. Opting for the right combination suited to the specific needs of your family or lifestyle will enhance both functionality and visual appeal.
Understanding Turf Quality: What Makes One Product Stand Out?
Quality is paramount when selecting artificial turf for your lawn. Not all turf products are created equal; factors such as material composition, UV resistance, and durability over time critically determine the outcome of your investment. High-quality turf should be manufactured with UV inhibitors to prevent fading and degradation from sunlight exposure, thus ensuring it looks vibrant year-round. Furthermore, look for products with warranties of ten years or more, which reflect a company’s confidence in their product’s durability.
When evaluating turf quality, examine the density of the fibers as well. Denser turf provides a more realistic feel and better resilience against foot traffic. An additional consideration is the infill used, which plays an integral role in providing support and bounce to the grass. Options such as sand or rubber infill can add tonality and softness to your lawn while improving drainage. Taking the time to research and understand the nuances of turf quality can ultimately enhance your satisfaction with the product and ensure longevity.
Grass vs. Grass: A Comparison of Aesthetic Appeal and Functionality
When deciding on artificial turf, balancing aesthetic appeal and functionality is key to achieving your ideal lawn. Different types of grass vary widely in appearance, from vibrant shades of green mimicking freshly mowed grass to varieties replicating the look of established, natural landscapes. In addition to color and texture, consider the performance under varied conditions. Some grasses perform better in full sunlight, while others may be more tolerant in shaded areas. Evaluating where the turf will be placed about sun exposure can inform your choice and ensure that the grass thrives in that specific environment.
Not only should your artificial turf look beautiful, but it must also hold up effectively throughout the seasons and withstand common wear and tear. If you have children or pets that frequently engage in play on the lawn, opting for a turf known for endurance and resistance to matting will serve you well. Discuss your lifestyle habits with a turf professional who can guide you in selecting grass that harmonizes with both appearances and functionality, bringing to life a lawn that’s not only visually pleasing but practical for everyday use.
The Installation Process: Crafting Your Perfect Lawn
From Consultation to Completion: What to Expect During Installation
Embarking on installing artificial turf begins with a comprehensive consultation, a critical step that allows professionals to assess your lawn’s unique needs. During this initial meeting, you’ll discuss your goals, preferences, and budget. Experts will evaluate current site conditions, including soil type, slope, and existing vegetation, which plays a substantial role in the installation process. This assessment allows for precise planning, ensuring the best outcome tailored to your specifications and desires.
Once the consultation concludes, a skilled installation team will transition your yard from vision to reality. The process typically includes several key stages: site preparation, base layering, turf placement, and finishing touches. Site preparation involves removing existing grass and debris, followed by leveling the ground and providing adequate drainage to avoid pooling. After adjustments, the installation team will install a base layer, usually composed of crushed rock or sand, providing a solid foundation that ensures durability and drainage.
Finally, after laying the turf, any seams will be secured, and infill materials will be applied as needed. This stage determines the grass’s look and feel, contributing to the final aesthetic. Completion signifies more than just a beautiful lawn; it’s an invitation to enjoy your outdoor space like never before.
DIY vs. Professional Installation: The Pros and Cons
The allure of a DIY artificial turf installation can be tempting, particularly for those who enjoy home improvement projects or wish to save on labor costs. However, it’s essential to weigh the pros and cons carefully. On the one hand, undertaking the installation yourself allows for a higher degree of control over the project timeline and cost. Resources are widely available online, from how-to videos to guides that offer step-by-step instructions. However, true mastery of turf installation requires experience and access to specific tools and materials that many DIYers may lack.
On the flip side, hiring professionals can offer peace of mind. Experts bring years of experience to the table, ensuring the process runs smoothly and efficiently. They are equipped to handle unforeseen issues that could arise during installation, such as drainage concerns or uneven ground. Their expertise not only guarantees a high-quality result but can also save time and potential frustration. In the end, considering your experience level, available time, and desire for quality may help you decide the best route for transforming your lawn.
Ensuring Proper Drainage: Keeping Your Turf Pristine
One of the often-overlooked aspects of artificial turf installation is ensuring proper drainage. Without effective drainage, artificial grass can suffer from water pooling, which can create an unattractive and unhygienic surface. Before installation, professionals will examine the landscape’s natural flow and make adjustments as necessary. Implementing a proper base layer designed for smooth drainage can significantly enhance the turf’s performance and longevity.
In addition to addressing drainage during installation, normal upkeep will include periodic checks to ensure no obstructions are preventing adequate water runoff. Routine maintenance, such as clearing debris, trimming surrounding plants, and cleaning the turf’s surface, can significantly extend the lifespan and appearance of your synthetic grass. Whether in sunny weather or rainy days, a well-drained lawn provides continuous enjoyment and reduces the need for repairs or replacements.
Maintaining Your Artificial Lawn: Keeping It Fresh and Fabulous
Simple Cleaning Tips: Ensuring Your Turf Stays Spotless
Like any other aspect of home care, maintaining artificial turf requires a regular cleaning routine to maximize its lifespan and visual appeal. Fortunately, upkeep is straightforward and time-efficient. A basic cleaning involves removing debris with a leaf blower or rake and occasionally hosing down the grass to eliminate dirt and dust. For pet owners, removing pet waste promptly will enhance cleanliness and keep odors at bay. Consider using an environmentally safe enzyme cleaner to tackle any lingering pet smells, ensuring your turf maintains its refreshing appeal.
In addition, regular brushing with a stiff-bristle broom can help lift matted grass blades, keeping them standing tall and enhancing the lawn’s natural look. These small acts of care contribute significantly to the overall health and satisfaction you derive from your artificial lawn, allowing you to highlight the joy of having a vibrant, pristine outdoor area.
Long-Term Care: When to Call in the Professionals
While routine maintenance may often be manageable for most homeowners, certain scenarios call for the expertise of professionals. After several years, natural wear and tear may occur that requires a detailed inspection by an expert. This may include examining the turf for signs of fading, uneven areas, or damage from overuse. Experienced installers possess the specialized knowledge needed to address these issues adequately and can offer solutions that keep your turf looking fresh.
Additionally, experts can assist with any necessary repairs or maintenance to the drainage system, ensuring continued functionality. These professionals can determine the best course of action when life’s unexpected events, such as severe weathe,r can impact your turf’s integrity. By entrusting complex concerns to seasoned professionals, you can enjoy peace of mind, knowing that your outdoor sanctuary is in capable hands.
Seasonal Adjustments: Preparing Your Lawn for San Diego’s Climate
San Diego’s temperate climate allows for outdoor enjoyment throughout the year, but it also demands a bit of attention to seasonal changes. While artificial turf is designed to withstand various weather conditions, small adaptations over the seasons can yield optimal longevity and beauty. In the fall, it’s wise to monitor for leaves and debris that can trap moisture, potentially impacting the turf’s health. A quick sweep or blow can prevent unnecessary accumulation.
Winter may bring cooler temperatures, but protective measures should keep your turf pristine through any unexpected cold snaps. Ensure that your drainage remains unobstructed to prepare for any winter rains. Spring and summer mean increased activity and foot traffic on your lawn, especially with outdoor gatherings. Regular cleaning during these seasons can prevent wear and tear; consider investing in high-quality infill if there’s a notable amount of compaction occurring. These small strategies ensure your artificial turf thrives throughout various conditions, maintaining its appearance and integrity.
Read More: justin david soberano


Wardrobe Hangover: Why You Keep Buying Clothes You Don’t Wear
The Quiet Shame Hanging in Your Closet Open your wardrobe right now. Look at it honestly. How many pieces in...


The Outfit That Speaks for Itself: Zach Bryan Merch, Parke, and Rolex Replica Every Day
Getting Dressed Should Feel Like a Decision, Not a Default Every morning, you choose what to wear, even when it...


Men’s Streetwear Denim Guide 2026: How Amiri and Mixedemotions Get Premium Jeans Right
Why Denim Became the Most Debated Purchase in Men’s Streetwear Denim sits at a strange intersection in men’s fashion. It’s...


Why Some Online Casino Games Feel Easier to Return To
Online casino lobbies are full of games trying to look different. One has a huge bonus feature. Another has a...


When Access Becomes Instant Patience Becomes Optional: Z library
The Speed of Modern Reading Long waits once shaped the reading world. A trip to the library meant fixed hours...


Assessing the Chances of South Africa at the World Cup
Football followers across the globe are counting down the days until the World Cup with fans in South Africa eagerly...


Designs that Support Longevity in Online Gambling Platforms
Online gambling platforms, including mobile apps like betway, are at their most popular today and that is not by luck...


Custom Tent Buying Guide: Key Features to Look for in a Durable Branded Display
A tent is much more than a practical shelter in the competitive nature of the events held at the trade...


Why Stability Matters: Navigating the Choice to Move Fostering Agencies
The decision to become a foster carer is often driven by a profound desire to provide a stable, loving environment...


Understanding Stairlifts in the Home
Stairlifts are a practical adaptation designed to support people who experience difficulty using stairs within their own homes. They are...


The Power of Digital Marketing for Business: A Guide to Maximizing Your Reach

Car Hire vs Public Transport: Which Is Best for Touring Switzerland?

Building trust in a rapidly evolving payments ecosystem

Can Your Business Survive Without a Charlotte SEO Agency in 2025?

Choosing the Right Will and Trusts Attorney for Your Estate Planning Needs

Remaining Healthy While Engaging in Online Casino Games
-
 Biography7 years ago
Jacqulyn Elizabeth Hanley is the Mother of Liza Soberano?
-
Biography7 years ago
Amanda Levy Mckeehan Biography, Family, Net Worth, Age, Affairs, Facts
-
Home6 years ago
Epson L3110 Driver Free Download Latest Updated Version
-
Games5 years ago
Best Free To Play MMORPG To Try This 2021
-
Biography7 years ago
Who is Rose Dorothy Dauriac? Scarlett Johansson Daughter?
-
Home7 years ago
Liza Soberano Biography, Age, Family and Boyfriends
-
Biography7 years ago
Jessica Ditzel Secret Information that Nobody Knows | Joe Rogan’s Wife
-
Biography7 years ago
What is the relation of Nathaniel Larry Osorno with Liza Soberano?