
Home Improvement
How to Clean Painted Floors?

Painted floors can add a unique touch to any room, but they also require proper cleaning to maintain their beauty. Whether you have a hardwood or concrete painted floor, regular cleaning is essential to keep the floors looking their best. In this article, we will discuss how to clean painted floors and provide helpful tips to ensure that your floors stay in top condition.
Preparation
Before you start cleaning your painted floors, it’s essential to prepare the space. Start by removing any loose dirt and debris using a soft-bristled broom. Next, you can either sweep the floor with a broom or use a vacuum cleaner with a soft brush attachment to remove any loose dirt, dust, or debris.
Dip a mop into the cleaning solution and wring out any excess water. You want the mop to be damp but not soaking wet. Start at the far end of the room and work your way towards the door, using gentle back-and-forth motions to clean the floor. Avoid using too much water, as excess water can damage the paint and cause it to peel. If you need to use more cleaning solution, rinse the mop and wring out the excess water before applying more cleaner.
Following these steps ensures that there is no dirt left on the floor that could scratch the painted surface during cleaning.
Best Products for Cleaning Painted Floors
When it comes to cleaning painted floors, you need to use products that are safe for the paint and won’t cause any damage. Avoid using abrasive cleaners which contain ammonia or bleach, acidic solutions, or harsh chemicals that can wear down the painted surface. Instead, opt for gentle cleaning solutions that won’t strip away the paint or leave any residue.
Note: Before you apply the cleaner to the entire floor, test it on a small area of the floor to ensure that it does not cause any discoloration or damage to the paint. If there are no adverse effects, then you can apply the cleaner to the entire floor.
Mild detergent and warm water
A mixture of mild detergent and warm water is an excellent cleaning solution for painted floors. Mix a small amount of mild detergent with warm water and mop the floor, ensuring that the mop is damp and not soaking wet. Rinse the mop frequently in clean water to prevent any dirt or soap from building up.
White vinegar and warm water
White vinegar is an effective and natural cleaning solution that won’t harm your painted floors. Mix one cup of white vinegar with a gallon of warm water, dip a mop into the solution, and wring it out. Mop the floor, rinse the mop frequently, and let the floor air dry.
Microfiber mop
A microfiber mop is an excellent tool for cleaning painted floors, as it won’t scratch the surface and is gentle on the paint. Dampen the mop with water or a gentle cleaning solution and mop the floor, making sure to rinse the mop frequently to prevent dirt or soap buildup.
Cleaning Techniques for Different Types of Paint
Different types of paint require different cleaning techniques to prevent any damage or wear. Here are some techniques for cleaning different types of paint:
Polyurethane floor paints
If you have polyurethane floor paints, it is essential to polish the floor periodically to protect the surface from scratches and wear. You can use a special floor polish designed for polyurethane floor paints or a wax-based polish to protect the surface. Follow the manufacturer’s instructions for best results.
Epoxy floor paints
Epoxy floor paints are tough and long-lasting, making them perfect for garages, basements, and other areas with heavy foot traffic. To clean epoxy floor paints, use a soft-bristled brush and a gentle cleaning solution. Avoid using abrasive cleaners or scrubbers that can damage the surface.
Acrylic floor paints
Acrylic floor paints are affordable and easy to apply, making them ideal for DIY projects. To clean acrylic floor paints, use a microfiber mop and warm water, and avoid using harsh chemicals or abrasive cleaners that can wear down the paint.
Cleaning painted floors doesn’t have to be a daunting task. With the right tools and techniques, you can maintain the shine and lustre of your painted floors for years to come. Remember to prepare the space, use gentle cleaning solutions, and avoid using abrasive cleaners or harsh chemicals that can damage the painted surface. With these tips in mind, you can keep your painted floors looking as good as new.
Understanding the Science of Lawn Fertilization
The Role of Nutrients: Nitrogen, Phosphorus, and Potassium Explained
At the heart of effective lawn care lies an understanding of the essential nutrients that contribute to vibrant, healthy grass. Nitrogen (N), phosphorus (P), and potassium (K)—collectively referred to as NPK—are fundamental elements for lawn growth. Nitrogen is crucial for achieving lush, green foliage, fostering robust leaf development, and overall vitality. It encourages photosynthesis, a process where plants convert sunlight into the energy they need to thrive, enhancing the lawn’s aesthetic appeal. Conversely, phosphorus plays a pivotal role in root development and the establishment of new grass. It is vital for flowering and seeding, contributing to a lawn that is not only visually attractive but also resilient and capable of providing a solid foundation for future growth. Potassium, often overlooked, is indispensable in regulating water use and improving stress tolerance, making grass more resilient against drought, heat, and diseases.
To optimize lawn health, a balanced application of these nutrients is essential. Professional lawn fertilization services in Dallas often employ soil testing to gauge existing nutrient levels and deficiencies, allowing them to implement tailored fertilization strategies. This precision ensures that the lawn receives the right amount of each nutrient when it’s needed most, leading to optimal growth and longevity throughout the seasons.
How Soil Quality Affects Fertilization: Testing and Amendments
The journey to a lush lawn begins below the surface, in the soil where grass roots grow and nutrient absorption occurs. Soil quality directly influences how effectively grass can utilize fertilizers. Poor soil structure, compaction, or imbalances in pH can hinder nutrient availability and absorption. Soil testing is a fundamental practice for any professional lawn care service; it provides insight into the pH level, nutrient content, and organic matter percentage, essential factors in determining which amendments are necessary.
Amendments can dramatically alter soil quality. For instance, adding organic matter like compost improves soil structure, facilitating better drainage and aeration. Lime can be applied to correct acidic soils, while sulfur can help acidify alkaline soils. Each of these amendments plays a critical role in enhancing nutrient availability and encouraging healthier growth. By employing a customized approach to soil management, professional lawn services not only address existing deficiencies but also set the stage for long-term health and resilience of the lawn.
The Chemistry of Green: Why Plants Thrive on Proper Feeding
Understanding plant biology adds another dimension to the art of lawn care. Grass plants absorb nutrients in ionic forms, and the availability of these nutrients depends on several chemical processes within the soil. For example, nitrogen in its ammonium form is readily absorbed by most grass species, but this isn’t always the case with other nutrients, such as phosphorus, which can bind tightly to soil particles and become unavailable. A professional understanding of these chemical interactions allows lawn care specialists to select the right fertilizers and application methods to enhance nutrient uptake.
Additionally, the timing of fertilization is crucial. Granular fertilizers release nutrients gradually, providing a steady supply for plants, while liquid fertilizers deliver an immediate nutrient boost. Professionals leverage their understanding of chemistry to recommend appropriate products and methods based on seasonal weather patterns, soil conditions, and the specific types of grass requiring care. This level of tailored service ensures not only greener lawns but also fosters a deeper connection between the consumer and their outdoor environment.
The Benefits of Hiring a Professional Lawn Care Service
Expertise and Experience: What Professionals Bring to the Table
The benefits of hiring a professional lawn care service extend beyond the mere act of applying fertilizer. Experts in the field bring years of experience, education, and a wealth of practical knowledge that can save homeowners from common pitfalls associated with lawn care. Understanding the intricacies of local grass types, soil conditions, and regional climate really matters. Professionals often possess certifications and training that inform their nutrient selection and application strategies.
An expert can identify signs of stress, disease, and pest infestation that may not be immediately apparent to an untrained eye. This ability to diagnose and treat problems proactively can mean the difference between a thriving lawn and extensive damage that is more difficult and costly to rectify. Furthermore, their access to high-quality products and specialized equipment ensures that the right fertilizers are used correctly, minimizing the risk of over-fertilization and associated environmental impact.
Customized Fertilization Plans: Tailoring Nutrients to Your Lawn’s Needs
No two lawns are alike; therefore, a one-size-fits-all approach to fertilization falls short. Professional lawn care services excel in developing customized fertilization plans tailored specifically to the unique needs of each lawn. Factors such as grass type, soil condition, sun exposure, and homeowner preferences all play a role in determining the best fertilization strategy. Through soil testing, professional input becomes evidence-based; it allows for specific nutrient imbalances to be addressed, leading to an optimal growth environment.
This tailored approach not only promotes more vibrant grass but also translates into long-term cost savings. By addressing specific deficiencies and promoting soil health, homeowners can reduce the need for additional inputs and labor-intensive lawn care interventions down the line. In this way, a well-planned fertilization strategy not only preserves the beauty of the lawn but also contributes to its sustainability over time.
Time-Saving Convenience: What You Gain from Outsourcing Lawn Care
In today’s fast-paced world, time is a precious commodity. Hiring a professional lawn fertilization service enables homeowners to reclaim valuable hours each week. Lawn care involves more than just fertilizing; it encompasses mowing, edging, aerating, and seasonal cleanup, all of which require dedication, expertise, and time. Professionals alleviate this burden, allowing homeowners to focus on what they enjoy most.
Moreover, outsourcing lawn care ensures that every task is executed with precision and efficiency. Professionals come equipped with the right tools, technology, and products to complete the job correctly the first time, avoiding wastage of resources or setbacks caused by improper application techniques. In the long run, investing in professional services not only yields a healthier lawn but also provides peace of mind, knowing your outdoor space is being cared for by experts.
Choosing the Right Fertilization Schedule for Your Dallas Lawn
Seasonal Considerations: Timing Your Fertilization for Maximum Impact
Seasons dictate the growth patterns of grass, making timing a pivotal factor in successful lawn fertilization. In Dallas, the temperate climate is characterized by hot summers and mild winters, influencing the types of grasses that thrive there. Understanding the optimal fertilization schedule according to seasonal needs can dramatically affect lawn health. For most cool-season grasses, late winter and early spring are prime times for nitrogen applications, stimulating growth as temperatures rise.
Conversely, warm-season grasses, prevalent in the Dallas area, benefit most from fertilization during late spring and early summer when temperatures are optimal for growth. Recognizing these seasonal nuances enables homeowners to apply fertilizers at the right time, maximizing nutrient uptake and ensuring a lush, healthy lawn. Based on these insights, a professional lawn care service can create a strategic fertilization calendar that aligns with the Dallas climate and specific grass type, further enhancing the lawn’s potential for success.
Understanding Weather Patterns: How Climate Affects Lawn Care
The unpredictable Texas weather can also present challenges for lawn care. Analysis of local weather patterns is crucial in formulating a successful fertilization strategy. For instance, heavy rainfall can wash away fertilizers before they have a chance to be absorbed, while prolonged drought can necessitate adjustments in nutrient delivery strategies to compensate for stressed grass. Understanding humidity levels and periods of heat or rain can guide professionals in adjusting application rates and methods accordingly.
Professional lawn care specialists stay informed about weather forecasts and seasonal shifts. With this awareness, they can time fertilization applications to align with favorable weather conditions, ensuring that nutrients are effectively utilized. By recognizing how environmental factors influence lawn health, professionals provide a level of care that far surpasses typical do-it-yourself approaches.
Growing Cycles: Identifying the Best Times to Feed Your Grass
Understanding the growth cycles of grass is essential for successful lawn fertilization. Different grass species exhibit varied responses to environmental stimuli throughout the year. During the spring, most grasses enter a vigorous growing phase, necessitating higher nitrogen levels to support rapid growth. Late summer is often a critical time for warm-season grasses, as they prepare for the upcoming dormancy during cooler months. This cycle requires strategic feedings to ensure grasses store energy reserves, enabling them to endure winter conditions.
By leveraging their expertise, lawn care professionals can identify the ideal feeding times, aligning nutrient applications with periods of growth and dormancy. This synchronization ensures that grasses remain healthy, strong, and vibrant through the changing seasons, resulting in a lawn that not only looks great but also withstands environmental stresses effectively.
Transforming Your Lawn: What to Expect from Professional Services
Visual Improvements: The Aesthetic Benefits of a Well-Fertilized Yard
One of the most immediate benefits of professional lawn fertilization is the visual transformation of your yard. A well-nourished lawn is characterized by vibrant green hues, density, and a lush appearance that enhances curb appeal. Healthy grass also provides a cushion, creating a soft surface underfoot, ideal for families and pets alike. Professional services utilize high-quality fertilizers that deliver key nutrients effectively, subsequently leading to rapid growth and improved aesthetics.
Moreover, over time, these visual improvements can significantly raise property value. A well-maintained yard is a hallmark of property pride, reflecting positively on both homeowners and their neighborhood. Professional lawn fertilization not only cultivates beauty but also potentially enhances financial return on investment, making it a valuable addition to any property management strategy.
Long-Term Health: The Impact of Regular Fertilization on Lawn Resilience
The benefits of professional lawn fertilization extend well beyond immediate visual enhancements. Regular feeding positively impacts the long-term health of your lawn, promoting deeper root systems and enhancing resistance to disease and pests. A robust, deeply rooted lawn minimizes soil erosion and improves water retention, making it better equipped to withstand challenging environmental conditions, including drought or heavy rains.
Continued professional care fosters nutrient-rich soil over time, increasing the capacity for water absorption and enhancing the overall ecosystem of the lawn. By investing in regular fertilization, homeowners are essentially committing to cultivating a sustainable landscape that not only thrives today but continues to prosper long into the future, creating an enduring environment that nurtures both biodiversity and aesthetic beauty.
Beyond Greenery: Enhancing Biodiversity and Soil Ecosystems
A healthy lawn contributes significantly to biodiversity and soil ecosystems. Professional lawn fertilization services consider the impact of their work on the broader environment. By applying organic fertilizers and practicing responsible lawn care, they promote microbial activity essential for soil health. Healthy soil teems with microorganisms that break down organic matter and improve overall soil structure.
Moreover, a thriving lawn provides habitat for various species, including beneficial insects that support plant health by controlling pests naturally. Professionals often integrate eco-friendly practices that emphasize the importance of maintaining not just a vibrant lawn but also contributing positively to the overall health of local ecosystems. This broader approach to lawn care encourages homeowners to appreciate the benefits that extend beyond their own properties, resulting in a more sustainable and enriching environment for the entire community.
In conclusion, professional lawn fertilization services in Dallas provide a comprehensive solution for transforming your yard into a beautiful, healthy space. Through an understanding of plant biology, soil chemistry, and environmental factors, professionals deliver unparalleled care that meets the unique needs of your lawn. The investment in regular, expert fertilization pays dividends in aesthetic beauty, long-term health, and environmental sustainability, affirming that the commitment to lawn care is a commitment to the flourishing of both the property and the community. By choosing to work with professionals, homeowners not only gain a stunning lawn but also a deeper engagement with nature, creating an outdoor oasis that enhances their quality of life and appreciation for the environment.
Read More: Luca Oriel

Your home is more than just a place where you eat and sleep. It is a reflection of you, a part of you, and above all, a sanctuary that reflects your style and preferences. Whether you’re a minimalist at heart or a fan of vibrant colors, you inevitably add pieces of your liking to your home. Infusing your home with your personality is one of the most rewarding aspects of interior design and home decor. There’s beauty in creating a personalized space that comforts you and reflects a part of yourself in each corner of your house. Small, thoughtful upgrades can go a long way, transforming even the most ordinary corner of your home into a statement piece.
Home decor is all about details and it’s often the most minute details that make your place stand out and make the biggest impact. A carefully chosen accent wall or a repurposed piece of furniture can lift the entire feel of a room and give it a sense of warmth and character. From unique color choices to decorative accessories, upgrades help breathe life into your home and add that extra hint of warmth to your bedroom or make your entryway truly majestic. According to Los Angeles property management experts houses with good decor sell at a better price compared to houses that lack personality and character.
In this article, we’ll explore a variety of creative ideas you can implement to upgrade your home and inject your personality into every corner of the house. So, if you are ready to move beyond generic colors and make your home truly a reflection of you, let’s dive into some of the creative upgrades that will add personality and character to every room.
Simple Upgrades To Make Your Home Truly “Yours”
- Statement Lighting Fixtures
Lighting is one of the transformative aspects of home design. A good accent light can immediately brighten up a dull corner. Placing overhead lights with bold pieces can truly elevate the look of your space. A boho-inspired lamp near the bedside can add warmth and comfort to your bedroom. For intimate touches, you can add wall sconces with intricate details and adjustable features to add charm and coziness to your rooms or hallways. In spaces like the living room or dining area, an oversized, eye-catching chandelier light can set the tone for the entire room. Under-cabinet lighting in the kitchen can also be used to give off a warm and welcoming atmosphere.
Did you know?
The median sale price for a home in Los Angeles, California is between $1.1 million and $1.3 million.
- Customized Wall Art and Murals
We all must have heard the saying, a painting is worth a thousand words. Walls are the easiest places to inject your personality through paintings and artwork. A good painting or a good mural tells a story that narrates your experiences directly or indirectly. A mix of gallery-style frames to display your artistic side along with family photos and vintage finds can create a meaningful pattern for your walls. Property managers in Washington suggest that houses with well-decorated walls attract good-paying tenants all year round. For a more personal touch, you can consider putting up unique prints or interesting souvenirs from your travels. From nature-inspired wall hangings to abstract geometric patterns, a mural can transform the entire walls and become the most eye-catching aspect of your entire house.
Did you know?
The average rent for a comfortable one-bedroom in Washington is $2,277.
- Textiles That Pop: Throw Pillows, Rugs, and Curtains
Textiles are one of the easiest and most affordable ways to add both comfort and style to a room. Throwing in pillows of funny shapes or adding wildlife-inspired rugs can make your space lively and hospitable. Curtains help to add that luxurious look to your space along with giving you the functionality to brighten up the house on a cloudy day or tone it down on a sunny day. Drapes can beautifully cover a window and introduce new textures or colors to complement the rest of your home decor.

- Creative Shelving Solutions
Do you often feel your room could be a bit more organized only if you had a few more shelves? Shelves can be the ultimate smart upgrade for your home. They are extremely functional and can also be stylish and contemporary. Floating shelves allow you to display books or quirky objects in a modern way. Arranging your favorite items in an organized way can be the most appealing aspect of your room, and for all people who find therapy in organizing things, shelves could be the ideal upgrade for your place.
- Indoor Plants and Greenery
Plants don’t just add color and life to your home; they also contribute to a fresh and relaxing atmosphere for your home. You can place your plants in any corner of the house, and they are perhaps one of the most easily manageable accessories of all time. From a towering fiddle-leaf fig to a cascading pothos, plants come in different styles to complement your personality perfectly. You can add shelf gardens in the bathroom or a large potted plant in the corner of your house to add an unexpected personal touch to your place.
Conclusion
Making your house a reflection of your personality doesn’t require a complete overhaul. Small upgrades can do the job rather perfectly and make an overall huge impact on the feel of your space. Embracing creativity and exploring your own taste can truly make your house a reflection of you.

Ducks can make a nuisance of themselves at your pool. You might have done everything possible to dissuade them, yet they appear to come back over and over. The reason ducks keep returning to your pool: What you really want to know In this article, we will discuss why ducks are attracted to your pool and what you can do to prevent them from visiting your pool along with the best robot pool cleaner to keep your pool clear of debris.
Why Pools Attract Ducks: The Don’ts Of Keeping Ducks Away.
Ducks love water and your pool is a great place to play in the water. Ducks may keep visiting your pool for any one of the following reasons:
Safe Water Source
A major reason ducks are drawn to your pool is that it offers an easy and safe water source. The still, clean water of your pool is an ideal place for ducks to swim, preen, and bathe. Pools would tend to be free of predators and many dangers that natural bodies of water have, allowing ducks to lounge in safety.
Lack of Natural Predators
Pools are usually situated in yards where natural enemies like foxes or coyotes do not roam, This prepares the ground for the duck to feel safe in this pool environment, the duck is unaware that it may be facing danger outside other places.
Food Availability
If you have been feeding the ducks or other birds, or if your neighbors have, they may think of your pool area as a food source. Ducks may be attracted to your pool if there are nearby crumbs, seeds, or even bugs for them to snack on. Once they discover a food source, they tend to return.
Shelter and Comfort
Ducks may rest or nest in the bushes, trees, or any other natural elements surrounding your pool, if there are any nearby. Your pool offers them a place to unwind without fear of becoming somebody else’s food.
How to Prevent Ducks from Returning?
Now that you know why ducks budget your pool, let’s get down to business. Here are a few tips that may help keep ducks from treating your pool like their personal hangout:
Use a Pool Cover
A pool cover is one of the best options to discourage ducks from visiting your pool. If your pool is covered, ducks will be much less able to get to the water, so they cannot swim, preen, or leave debris behind.
Install Pool Fencing
Ducks are capable of flying, but you could put a fence around your pool so that they would find it tough to land on. The fence should be at least 4 feet tall with no holes for the ducks to squeeze through. Not one fence will stop ducks from landing, but it also makes your pool area feel less inviting to them.
Install Motion-Activated Sprinklers
Ducks do not like to be sprayed with water. A motion-activated sprinkler can kick on when the ducks get near, scaring them away from landing in your pool in the first place. These are great sprinkles because the water comes on when they feel active, making sure they don’t become a nuisance for you all the time.
Install Visual Deterrents
Visual deterrents scare the ducks away easily. Dispel the Danger: Predator decoys like owls, hawks, etc. You can also hang shiny objects, aluminum foil, or reflective surfaces around the pool to scare the ducks away.
How a Robot Pool Cleaner Keeps Your Pool Clean?
Regardless, since they can leave debris, feathers, and droppings behind you’ll want to make sure you keep your pool clean even if you try to deter ducks. The good news is a robot pool cleaner such as the Beatbot iSkim Ultra or the Beatbot AquaSense Pro can keep your pool clean all with no effort on your part.
Robot Benefits: Why Use a Pool Cleaning Robot?
Deep Clean: A pool cleaning robot can help clear out leaves, dirt, and anything organic that ducks might leave behind, keeping your pool looking as perfect as you like.
Time-Saving: After doing it the first time yourself, These robotic pool cleaners swim into your pool and clean themselves without your help, so you no longer have to manually clean your pool or think of the dips they leave on your pool.
Efficient WaterCleaning: QuantumTech pool vacuum robots, such as the Beatbot AquaSense, utilize sophisticated filtration systems to keep your pool water free from even the finest of particles.
Pool cleaning has now become more effortless for the owner, no need to take a long break from duck hunting thanks to a robot pool cleaner you can keep your pool clean, no need to worry about the ducks they will continue to visit.
Duck Prevention: Some Extra Tips
Here are some extra tips that may deter ducks from coming back:
Remove Food Sources
If you’re feeding ducks or other birds around your pool, cease doing so. Ducks are more apt to come back if they know there’s food nearby. Removing food sources will prevent them from choosing your pool area as their feeding spot.
Modify Pool Landscaping
If possible, trim or remove nearby bushes, trees, or any tall plants that may provide ducks with cover near your pool. To deter ducks from visiting your pool, consider making your pool area less inviting by covering pool floats or providing them with shady places to rest elsewhere.
Final words: Smart ways to keep ducks away
Ducks may be delightful creatures when they are on land, but having them in your pool can present all sorts of issues. The first step in solving a duck pool problem is understanding why ducks keep coming back. Get a pool cover and a motion-activated sprinkler and have the Beatbot AquaSense Pro do the cleaning so you don’t have ducks pooping in your pool.
All in all, maintaining your pool without trash and impurities is important, so a swimming pool robot cleaner will remove any litter left behind by ducks and we all know it is a smart investment. Armed with these strategies, you’ll be able to enjoy your pool without a constant flow of feathered visitors.


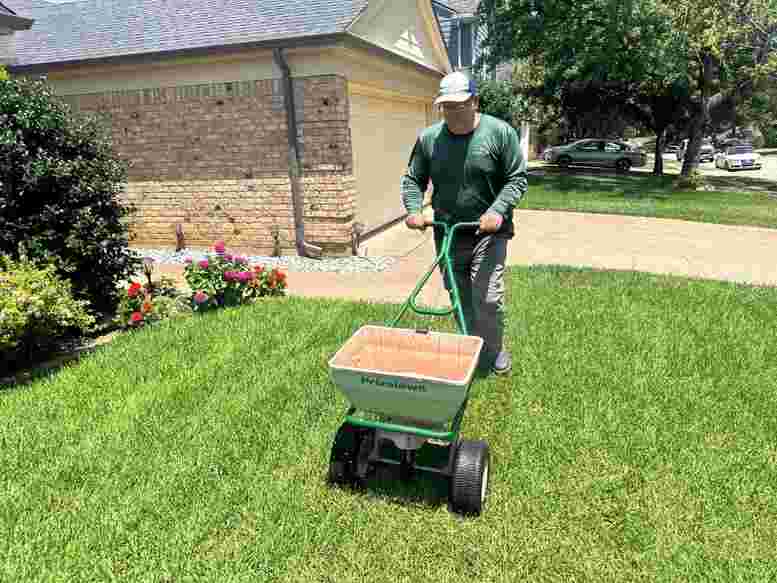
Transform Your Yard with Professional Lawn Fertilization Service in Dallas
Understanding the Science of Lawn Fertilization The Role of Nutrients: Nitrogen, Phosphorus, and Potassium Explained At the heart of effective...


Struggling with Debt? Here’s a Simple Guide to Finding Relief Without Adding More Stress
Finding Relief Without Adding More Stress Debt can feel like a heavy weight on your shoulders. You’re not alone –...


What Makes a Polycarbonate Sheet Ideal for Weather-Resistant Installations
No other material other than polycarbonate sheet comes to mind when it involves installation of weather-resistant applications. Featuring unmatched strength,...


The Role of Headless CMS in Managing Large-Scale Documentation Systems
However, as businesses grow and the amount of documentation increases, sifting through massive amounts of documentation can become increasingly tricky....


From Courtside to Crypto: The Rise of Crypto Betting in 2025’s Sports Landscape
In 2025, the intersection of sports and digital currencies is rewriting the rules of fan engagement—most notably in the booming...


Celebrity Parents Reveal the Top Stroller Trends of 2023
Ever noticed how a baby accessory becomes an overnight sensation after a celebrity is spotted with it? From designer diaper...


Settling an Estate? Here’s How the Right Appraisal Can Streamline Probate
Settling an estate is perhaps one of the most difficult legal battles you are bound to deal with at some...


FurMark Free Download + Serial Key
Ever wondered if your graphics card could survive a digital apocalypse? Or maybe you just bought a used GPU and...


The Ultimate Guide to Birthday and Bachelorette Parties in Charleston, SC
Introduction Charleston, South Carolina, is a wonderful place to celebrate special events like birthday parties and bachelorette parties. Many people...


The GameZone TableGame Champions Cup: Where Tongits Stars Are Born
Have you ever dreamed of turning your love for card games into fame and fortune? Look no further than the...


Legal Cash Advances: Bridging the Financial Gap Between Health Needs and Justice

3 Essential Tips for Choosing the Right Property Developer

Reliable and Comfortable Transportation for Your Charleston Events: Airport Shuttle and Wedding Transport

Nike Forecast 2025: What’s Coming Next for the Sports Giant?

Here’s Why the Sports Betting Market Isn’t Going Anywhere Anytime Soon: A Look at Its Lucrative Business and Expanding Potential

A Detailed Overview of the Litigation Process
-
 Biography6 years ago
Jacqulyn Elizabeth Hanley is the Mother of Liza Soberano?
-
Home5 years ago
Epson L3110 Driver Free Download Latest Updated Version
-
Games4 years ago
Best Free To Play MMORPG To Try This 2021
-
Biography6 years ago
Amanda Levy Mckeehan Biography, Family, Net Worth, Age, Affairs, Facts
-
Biography6 years ago
Who is Rose Dorothy Dauriac? Scarlett Johansson Daughter?
-
Biography6 years ago
Jessica Ditzel Secret Information that Nobody Knows | Joe Rogan’s Wife
-
Biography6 years ago
What is the relation of Nathaniel Larry Osorno with Liza Soberano?
-
Home6 years ago
Liza Soberano Biography, Age, Family and Boyfriends