Viral
3D Printers in Military: Rapid Manufacturing and Repair of Parts
This is a guest contribution by Egor Driagin, CMO at Top3DGroup
The arrival of 3D printing technology resulted in more questions than answers for the experts and enthusiasts alike. While they are theorizing about printing everyday items on the Moon surface, the American military found ways to utilize 3D printing in real-life conditions. The American military is using portable Expeditionary Lab Mobile (ELM) solutions in conjunction with 3D printers.
The main goals for ELM are: manufacturing single-use tools for military usage and repairing existing equipment. The latter is very important since field usage of equipment often requires some refining. A good example would be a pocket flashlight. They are often defective, which means they can easily break or cause unwanted situations.
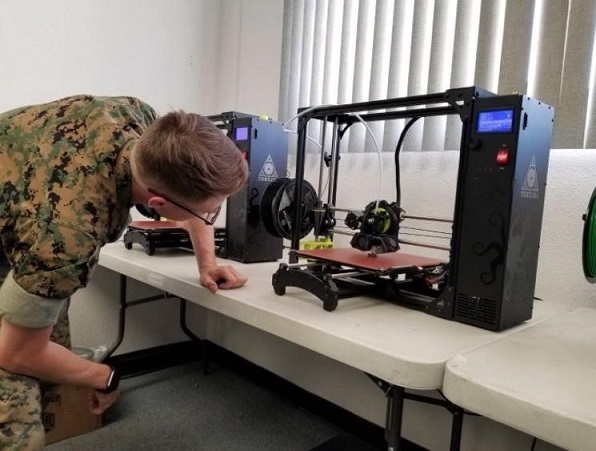
Using 3D Printers on a Battlefield
Being placed in a pocket of a soldier, the flashlight with a defective switch can be turned accidentally turned on and give out its location when it’s least expected. ELM can easily fix the problem of a defective switch. There’s no need to send them back to the US since the switches can be 3D printed on site.
Another example would be a real case when a mine detector sent to Iraq had defects that caused its working time to be reduced threefold. This made the soldiers (that were already on a complicated mission) take several additional heavy batteries with them. Using ELM allowed them to create an adapter that made using other batteries possible and extended the battery life of a device to 9 hours.
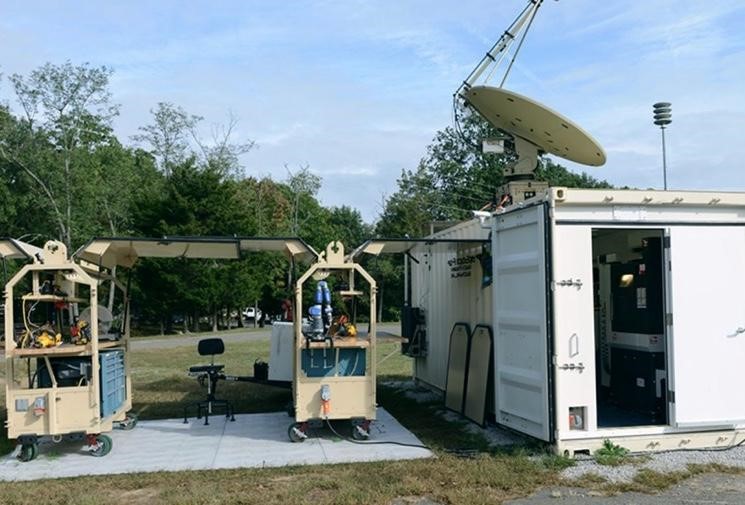
ELM Repair Kit with a 3D Printer and Communication System
Expeditionary Lab Mobile is a shipping container (sized 20 x 8 ft or 6,1×2.4 m) of a standard type. A 3D printer and CNC machines can be found inside, the latter of which is used to manufacture complex aluminum and steel parts.

Apart from that, there is also a set of rather traditional tools, such as a cutter, welding machine, router, circular saw, sawzall, and a jigsaw.
ELM includes satellite communication equipment that is important for video conferences. The engineers and officials are supposed to partake in them to control the works when needed. It’s planned that each lab will include 2 engineers and all of them will be connected as a network.
Nevertheless, such a 3D printing system is expensive and costs around $2.8 million. First ELMы will be tested in the Middle East, and if successful, they will be implemented for civil purposes as well. They can be very useful during natural or man-made disasters.
Plastic welding kits are a must-have for plastic fabrication, repair, and modification. Whether you work in the plastic industry or you’re a lover of DIY projects, with a plastic welding kit, you can get more done without the need for a professional. So, in essence, you’re saving time, money, and energy! There are many applications, but the question remains: when exactly does it come in handy?
Why Replace It When You Can Repair It?
People quickly throw out broken plastic materials because the thought of repairing them is tiring. But, if you work in the plastic industry or you’re a DIY enthusiast, then you would know that no plastic is beyond repair unless it’s shattered to powder.
Rather than replace your favorite plastic materials, you can grab a kit and fix it. From plastic furniture to automotive parts and garden tools, a plastic repair kit has what it takes to restore your household plastic items.
Long Lasting Repairs
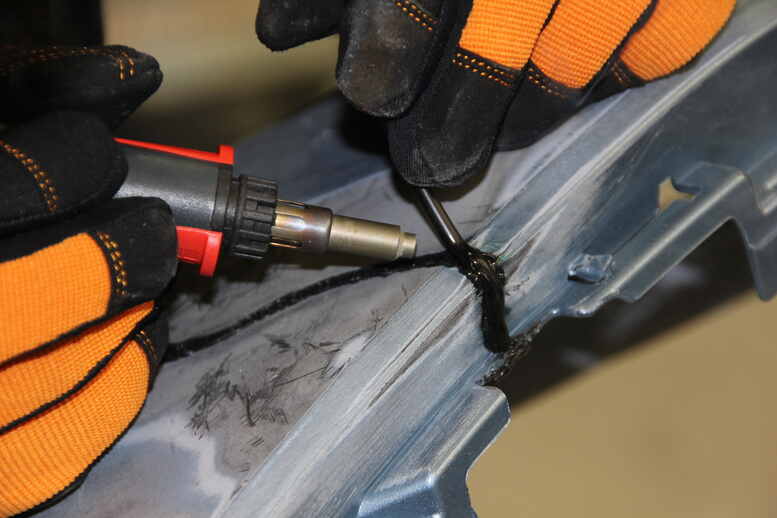
If you want industry-grade repairs without the need for a plastic welder, what you need is a solid plastic kit. There are different types of kits, all curated specifically for different grades of repairs. But for household projects, a basic plastic repair kit will do. A typical plastic welding kit contains welding tips, a welding rod, alloy steel staples, a metal brush, and a hot air gun.
The kits always come with a guide. The level of expertise you have doesn’t really matter; as long as you can handle medium-level tools, you should be able to use one.
The Versatility
We’ve said it before, and we’ll say it again: regardless of your industry, niche, or level of expertise, you’ll find use for a plastic welding kit. It can be used;
- Sealing pipe leaks in the plumbing industry
- Fixing bumper cracks and dents in the automotive industry
- To weld plastic sheets in the construction industry
- To repair household plastic materials and take your DIY project to the next level
When used correctly, a plastic welding kit can transform your projects, reduce work time, guarantee seamless repairs, and extend the lifespan of your plastic materials. If you need to learn about plastic welding, check out the latest news in our blog section and stay updated on the latest in the industry.
Read More: Bryan Chatfield Sanders

Planning a wedding comes with countless details, one of which is managing transportation for guests. Many couples want to make sure their guests feel cared for and have a memorable experience from start to finish. Using a shuttle service for wedding guests can solve numerous logistical challenges while adding a touch of elegance to the day. Here’s why a shuttle service is an ideal choice for transporting wedding guests and how they can enhance the experience.
- Enhanced Guest Convenience
One of the primary reasons couples choose shuttle services for weddings is the convenience it offers guests. Weddings often take place at venues with limited parking or remote locations, which can make transportation challenging. A shuttle service eliminates the need for guests to navigate unfamiliar areas or worry about parking. By providing a reliable shuttle, couples can ensure that all guests arrive safely and on time, without the added stress of finding the venue or dealing with traffic. Plus, shuttles can pick guests up from designated hotels or central meeting points, making it easier for everyone.
- Improved Safety and Enjoyment
A shuttle service enhances safety, especially for weddings where guests may be celebrating with a few drinks. By arranging a shuttle, couples allow guests to enjoy the festivities without the worry of driving back late at night or needing a designated driver. Additionally, shuttles provide a space for guests to relax, socialize, and extend the celebration while traveling to and from the venue. For weddings held in secluded locations, shuttle services can help ensure that guests aren’t stranded or dealing with hazardous late-night driving.
- Efficient Time Management
Shuttles can streamline the schedule and help weddings stay on time. With a designated transportation plan, couples can set clear departure and arrival times to keep the day on track. Shuttle services allow couples to manage the flow of guests, ensuring everyone arrives promptly for the ceremony and that the celebration begins as planned. Shuttle drivers are experienced in working with event timelines, which helps avoid delays and ensures a smooth, enjoyable experience for all.
- Cost-Effective Solution for Group Travel
For couples hosting a larger wedding, providing transportation might seem costly initially, but it can be surprisingly affordable, especially when compared to individual travel arrangements for numerous guests. Shuttle services often offer packages for weddings, and the cost of renting a shuttle is typically lower than arranging multiple taxis or rideshare vehicles. Additionally, guests won’t have to worry about the cost of parking or arranging separate transport options, which can be particularly valuable for out-of-town attendees.
- A Cohesive Experience and Added Luxury
Shuttle services can add an element of luxury and thoughtfulness that many guests appreciate. Offering a shuttle creates a seamless, coordinated experience that reflects the couple’s attention to detail and care for their guests’ well-being. Some couples even decorate the shuttles to match their wedding theme or provide music and refreshments, turning the shuttle ride into an extension of the celebration. These personal touches can make the experience more memorable and enjoyable.
- An Eco-Friendly Transportation Choice
For environmentally conscious couples, shuttle services offer a more eco-friendly transportation option. By consolidating transportation into one or a few vehicles rather than multiple individual cars, shuttle services help reduce the wedding’s overall carbon footprint. This is especially beneficial if the venue is in a remote location, as it minimizes emissions from guest vehicles. Some shuttle companies even offer eco-friendly fleet options, making it a sustainable choice for group travel.
- Accommodates Guests with Special Needs
Shuttle services can be especially helpful for guests who may need extra assistance, such as elderly relatives or those with mobility issues. Many shuttle companies offer ADA-compliant vehicles equipped with wheelchair ramps or other features to ensure comfort for all guests. This added convenience can be invaluable for guests who might otherwise have difficulty with standard transportation options.
- Planning Tips for a Smooth Shuttle Experience
To ensure a seamless shuttle service experience, there are a few planning tips couples should keep in mind:
- Book Early:Shuttle services are popular for weddings, especially during peak wedding season. Booking early ensures availability and allows time to coordinate pickup and drop-off points.
- Communicate with Guests:Let guests know about the shuttle schedule and pickup locations in advance, either in the invitation or through a wedding website. Providing this information helps everyone plan accordingly and reduces last-minute confusion.
- Consider Multiple Trips:If your guest list is large, consider arranging for multiple trips to accommodate everyone. This way, guests can choose from different pickup times that work best for them.
- Coordinate with the Venue:Work with your venue to establish clear pickup and drop-off areas. Some venues have specific spots for shuttles, and this helps make the process more organized.
Conclusion
Offering a shuttle service for wedding guests is a thoughtful gesture that provides convenience, safety, and an added touch of luxury to your special day. From cost savings to an improved guest experience, a shuttle helps ensure that everyone arrives at the wedding relaxed, on time, and ready to celebrate. For couples looking to simplify logistics and create a memorable day for their loved ones, shuttle services are a practical, elegant solution that truly enhances the wedding experience.

Having your building properly insulated is of utmost importance in this day and age of rising energy costs and increasing environmental concerns. Among the many insulation options available, spray foam stands out, known for its remarkable efficiency and unique properties.
But when diving into the world of polyurethane foam, you are immediately met with a choice: open cell or closed cell? Each comes with its own set of benefits and considerations. Let’s take a closer look.
Spray Foam Insulation: The Basics
Derived from a synthetic polymer blend, spray foam insulation plays a pivotal role in enhancing energy efficiency. It’s widely used to insulate walls, roofs, and other sections of buildings, cutting down those hefty heating and cooling bills. Beyond residential structures, you’ll find it guarding pipes, tanks, and machinery in industrial settings.
So, what makes it so versatile? The answer lies in its creation. By mixing multiple liquid components, including those with heat-insulating agents, this foam offers unparalleled insulation advantages. But not all foams are created equal.
Open Cell Insulation
1. What’s it like?
Open cell foam is softer and more flexible, expanding significantly upon application – up to a whopping 100 times its initial size!
2. Air’s Arch-nemesis:
Boasting a density of 0.4 – 0.6 lbs/cubic foot, it’s a champion in reducing air leaks, which can have a direct impact on indoor air quality.
3. Silence, Please:
If you’re looking to mute those external noises, open cell is your ally. It’s exceptional at dampening sounds and vibrations.
4. Adaptable and Tenacious:
As buildings shift over time, open cell foam remains resilient, enduring seasonal changes without cracking.
5. Easy on the Wallet:
Budget-conscious homeowners rejoice! Open cell insulation is generally more affordable due to its lower installation resource needs.
6. A Few Shortcomings:
It does have a lower R-value (3.5 – 3.9 per inch), so its thermal resistance isn’t as high. Additionally, it doesn’t act as a moisture barrier, which could invite mold or structural damage. And, to safeguard against fire, UV rays, or pests, you’ll need to add extra protective layers.
Closed Cell Insulation
1. What’s it like?
Unlike its open-cell counterpart, closed cell foam is dense and rigid, expanding to depths of about 30-50mm.
2. The Impenetrable Fortress:
With a density of 1.5 – 2 lbs/cubic foot, closed cell acts as both an air and moisture barrier, championing superior thermal resistance.
3. Sturdy and Strong:
One of its crowning glories is the ability to enhance a building’s strength, adhering firmly to the structure.
4. The Price Tag:
Its benefits come at a cost – literally. Closed cell insulation tends to be pricier due to the increased material and labor needs.
5. Impressive Thermal Capacity:
If retaining heat is your primary concern, this foam, with its R-value of 6 – 7 per inch, has got you covered.
6. Barrier Benefits:
Not only does it keep the cold air out, but it’s also a barrier against water, minimizing condensation issues.
7. Built to Last:
Come rain or shine, or the threat of pests, closed cell foam stands firm. However, its rigidity can be both a blessing and a curse. Over time, temperature changes might cause it to shrink and crack.
Final Thoughts
Insulation using polyurethane foam has undeniably revolutionized the world of building insulation. Companies like Isothane are at the forefront, ensuring the quality and efficiency of this material.
When deciding between open and closed cell, consider the specific needs of your project, budget, and long-term goals. Both have their merits, and understanding them can help you make an informed decision, ensuring that your space is comfortable, efficient, and protected for years to come.
For mor information visit https://isothane.com/spray-foam-insulation/


Wardrobe Hangover: Why You Keep Buying Clothes You Don’t Wear
The Quiet Shame Hanging in Your Closet Open your wardrobe right now. Look at it honestly. How many pieces in...


The Outfit That Speaks for Itself: Zach Bryan Merch, Parke, and Rolex Replica Every Day
Getting Dressed Should Feel Like a Decision, Not a Default Every morning, you choose what to wear, even when it...


Men’s Streetwear Denim Guide 2026: How Amiri and Mixedemotions Get Premium Jeans Right
Why Denim Became the Most Debated Purchase in Men’s Streetwear Denim sits at a strange intersection in men’s fashion. It’s...


Why Some Online Casino Games Feel Easier to Return To
Online casino lobbies are full of games trying to look different. One has a huge bonus feature. Another has a...


When Access Becomes Instant Patience Becomes Optional: Z library
The Speed of Modern Reading Long waits once shaped the reading world. A trip to the library meant fixed hours...


Assessing the Chances of South Africa at the World Cup
Football followers across the globe are counting down the days until the World Cup with fans in South Africa eagerly...


Designs that Support Longevity in Online Gambling Platforms
Online gambling platforms, including mobile apps like betway, are at their most popular today and that is not by luck...


Custom Tent Buying Guide: Key Features to Look for in a Durable Branded Display
A tent is much more than a practical shelter in the competitive nature of the events held at the trade...


Why Stability Matters: Navigating the Choice to Move Fostering Agencies
The decision to become a foster carer is often driven by a profound desire to provide a stable, loving environment...


Understanding Stairlifts in the Home
Stairlifts are a practical adaptation designed to support people who experience difficulty using stairs within their own homes. They are...


The Power of Digital Marketing for Business: A Guide to Maximizing Your Reach

Car Hire vs Public Transport: Which Is Best for Touring Switzerland?

Building trust in a rapidly evolving payments ecosystem

Can Your Business Survive Without a Charlotte SEO Agency in 2025?

Choosing the Right Will and Trusts Attorney for Your Estate Planning Needs

Remaining Healthy While Engaging in Online Casino Games
-
 Biography7 years ago
Jacqulyn Elizabeth Hanley is the Mother of Liza Soberano?
-
Biography7 years ago
Amanda Levy Mckeehan Biography, Family, Net Worth, Age, Affairs, Facts
-
Home6 years ago
Epson L3110 Driver Free Download Latest Updated Version
-
Games5 years ago
Best Free To Play MMORPG To Try This 2021
-
Biography7 years ago
Who is Rose Dorothy Dauriac? Scarlett Johansson Daughter?
-
Home7 years ago
Liza Soberano Biography, Age, Family and Boyfriends
-
Biography7 years ago
Jessica Ditzel Secret Information that Nobody Knows | Joe Rogan’s Wife
-
Biography7 years ago
What is the relation of Nathaniel Larry Osorno with Liza Soberano?